How to Ignore Internal Traffic in Google Analytics for Data Accuracy
Last Updated on
Intro
Just launched your new website and excited about the incoming traffic? Hold on a bit! Chances are, your GA4 stats are being skewed by your own page visits. Besides inflating page view numbers, if you're testing your website in different browsers or incognito windows, it might register these as unique users. To get a more realistic picture, you need to exclude your internal traffic. In this article, I'll explain how to do just that to ensure your data remains accurate for insightful analysis.
Step 1: Locate Your GA Property

- Open Google Analytics
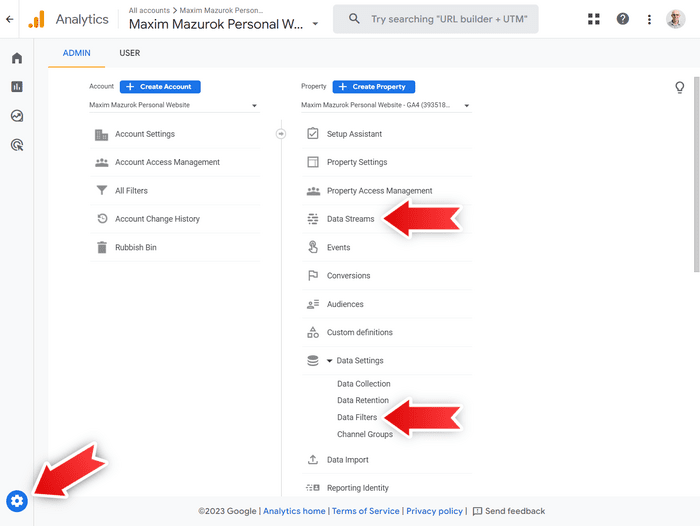
- Click "Admin" (a cog icon in the bottom left corner)
- Make sure you're on the "Admin" tab, not the "User" tab
- Select your account in the "Account" dropdown
- Select your property in the "Property" dropdown
Step 2: Define Internal Traffic
Define the IP address range that includes your home or office.

Click on the "Data Streams" option in your property
Ensure you're on the "Data streams" page; the URL should resemble: "https://analytics.google.com/analytics/web/#/a123456789p123456789/admin/streams/table/"
Click on the "Web" tab
Select your website stream
On the "Web stream details" page, in the "Google tag" section, select "Configure tag settings"
On the "Google tag" page, "Configuration" tab, the "Settings" section, click "Show more" at the bottom to see all settings
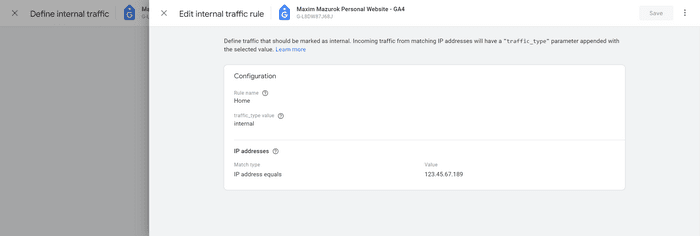
Click "Define internal traffic"
On the "Define internal traffic" page, in the "Internal traffic rules" table, click "Create" and follow the prompts
Note: Keep the "traffic_type value" as "internal", or write down what you input as we'll need this later.
Tip: You can find your current IP address on WhatIsMyIPAddress.com
Step 3: (Optional) Test Your Settings
It's important to test your settings to avoid inadvertently ignoring traffic from actual users.
By default, Google creates an "Internal Traffic" filter for you with "Filter state" set to "Testing". This setup collects data into a "Test data filter name" dimension, allowing you to preview what the stats would resemble with the filter activated. If you wish to ensure the filter's existence, refer to Step 4.
Remember, data filters can't be applied retrospectively. So, it's prudent to activate the filter sooner to prevent internal traffic from skewing your stats.
Here's how you can apply the filter to your data:

- Open Google Analytics
- Click "Explore" on the left
- On the "Explorations" page select "Free-form"
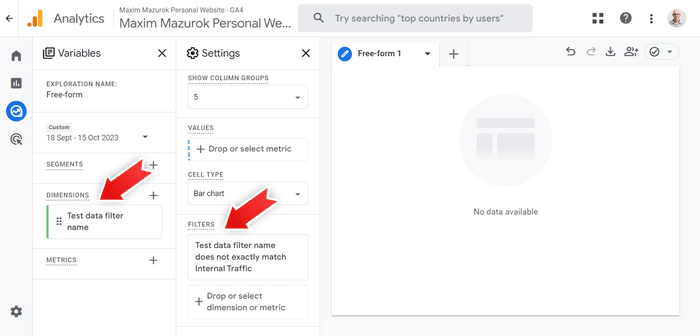
- To apply a filter, in the "Variables" column, "Dimensions" section, click the plus icon to add a new one
- In the "General" section, select "Test data filter name" and click "Import" on the top right
- Now to apply a filter, in the "Settings" column, "Filters" section, click on "+ Drop or select dimension or metric"
- Select "Test data filter name" from the dropdown
- In "Conditions", select match type "does not exactly match" and then in "Enter expression" select "Internal Traffic"
- Click "Apply"
Step 4: Activate Data Filter
When you're happy with your settings, activate the filter.

- Go to your property (see Step 1 on how to get there)
- Click on the "Data Filters" option in your property
- Expand the "Data Settings" option
- Select "Data Filters"
- You should have "Internal Traffic" created by default, open it. If it isn't there - click "Create filter" → "Internal traffic", set "Data filter name" to "Internal Traffic"
- "Filter state" by default is set to "Testing", to activate the filter - change it to "Active"
Summary
In this article, we walked through the steps of excluding internal traffic from your Google Analytics to ensure more accurate data analysis. By following this guide, you'll avoid the common pitfall of misinterpreting your site's performance due to skewed data. For more info, check out the official guide: [GA4] Filter out internal traffic
Please, share (Tweet) this article if you found it helpful or entertaining!