Free Periodic Visual Testing with Percy, GitHub Actions, and Slack
Published on
Intro
Visual testing helps you catch unwanted changes to your website. For example, if you have global CSS for multiple pages and make changes for one page, it might introduce unexpected issues on another page. Visual testing tools can help automate the review process of visual changes to your website.
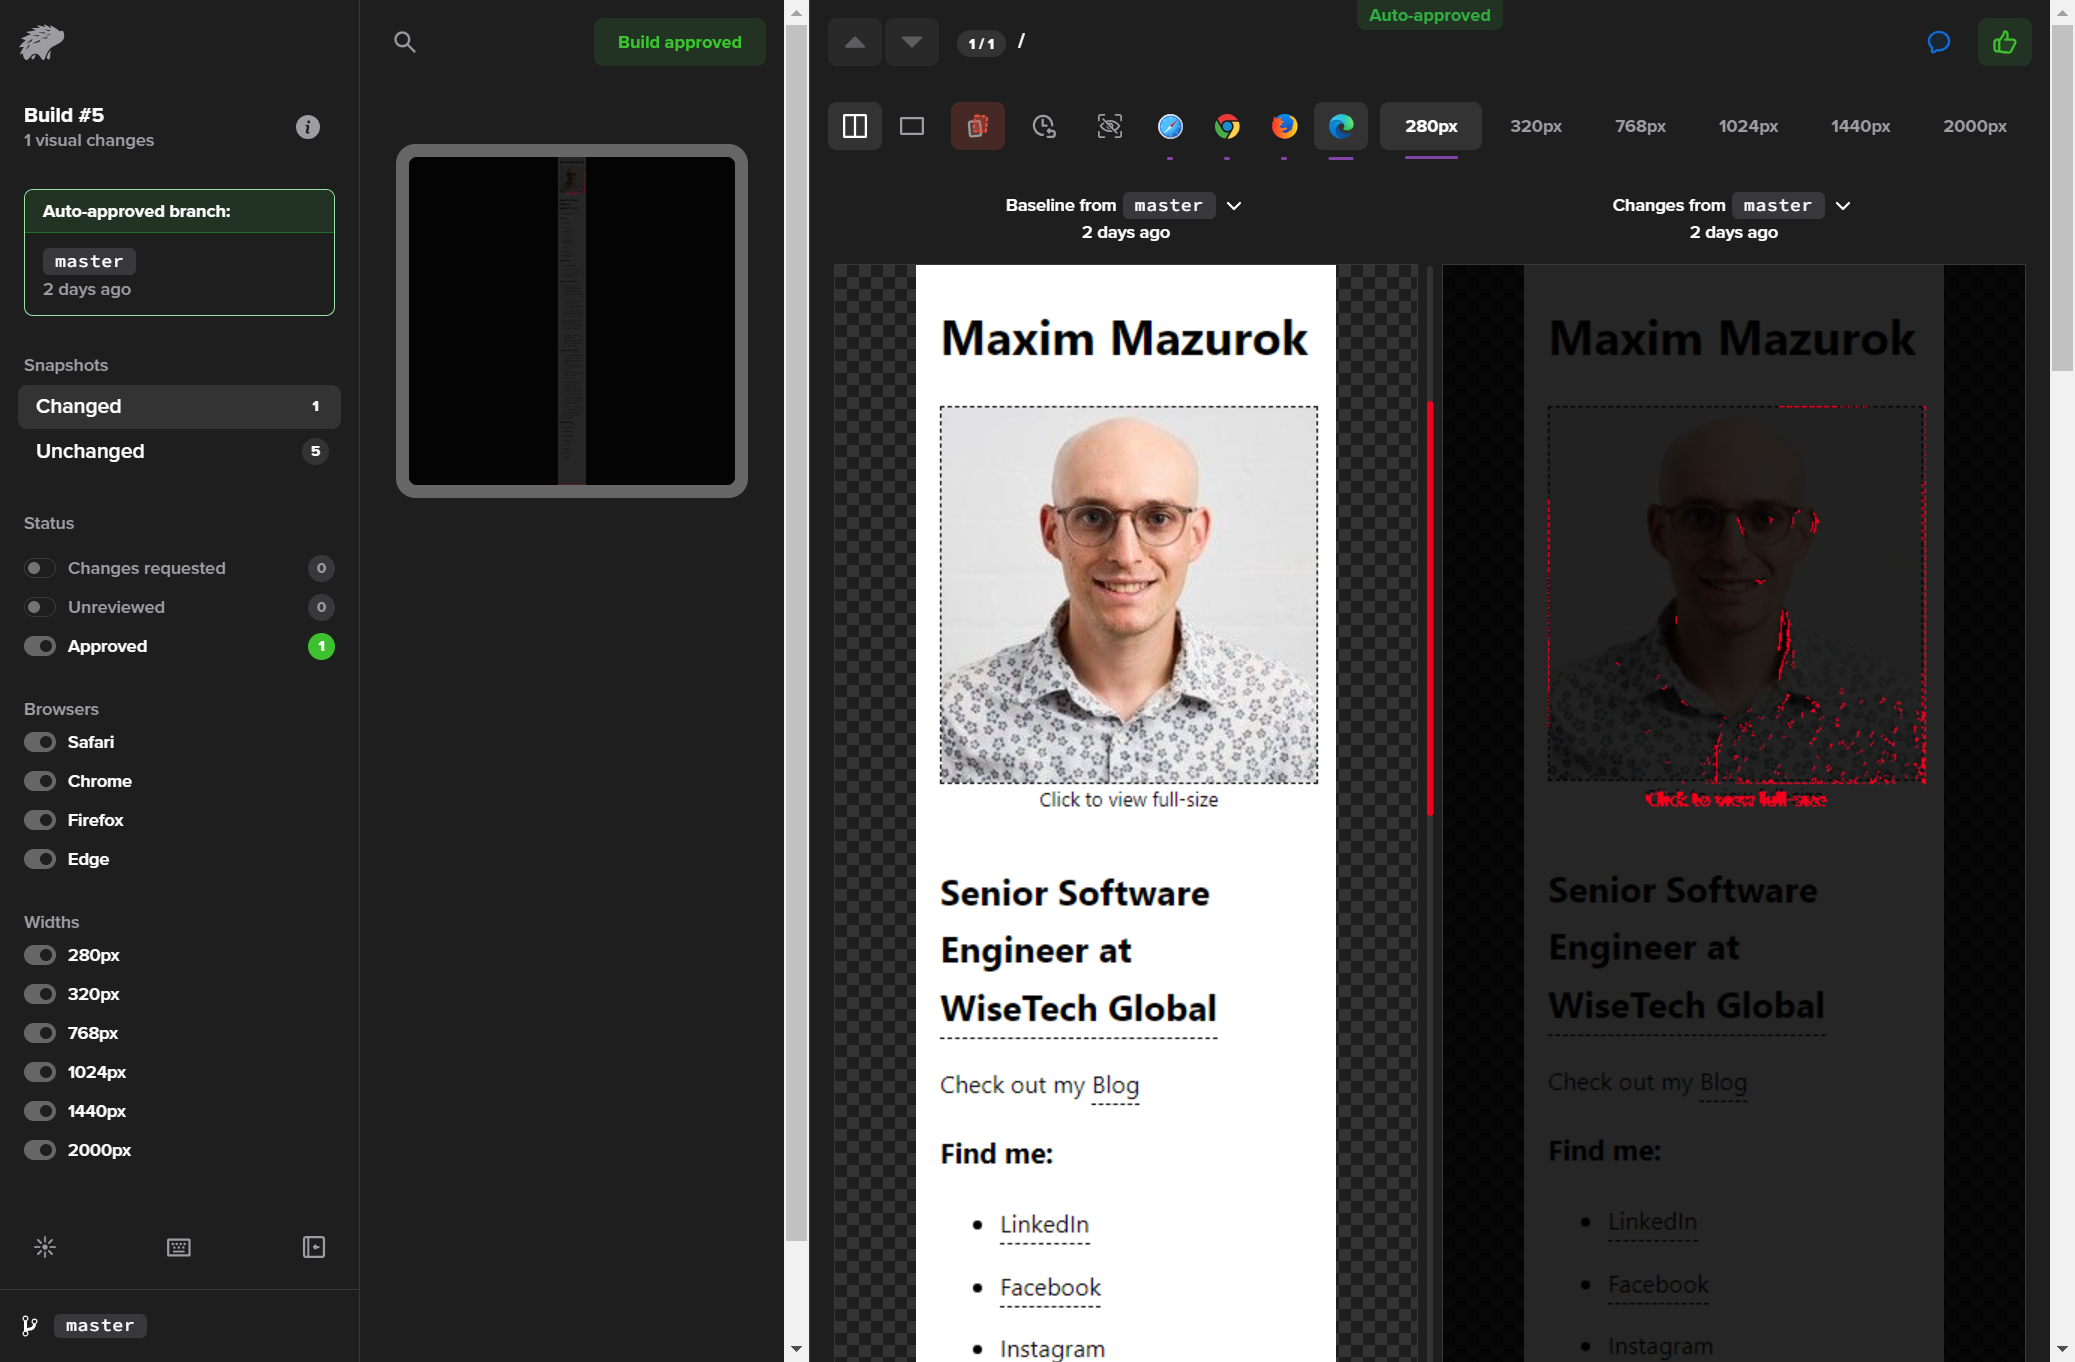
Percy by BrowserStack is a tool for that, it can take screenshots of your website pages using different browsers and screen resolutions. Then it will compare them to the previous (baseline) screenshots and tell you which pages have changed and require your review and approval.
GitHub Actions is a CI/CD tool for automating your workflows, it integrates seamlessly with Git repositories hosted on GitHub.
Slack is an instant messaging platform for teams, and Percy easily integrates with it, allowing you to get push notifications on your devices when a visual change is detected for you to review.
In this article, I will tell you how I set up free visual testing for my blog using the above tools. Note, that I chose periodic testing on production instead of trying to catch unwanted visual changes in a CI/CD process, because in my case this seems to provide a perfect balance between quality and resource usage, as well as my risk tolerance for this project, consider if this is right for you.
Setting up Percy

- Go to Percy
- Sign up for a free account
- Create new project
- Link your GitHub repository to see at which commit the test was run
Note: this is indicative only in my approach since we'll be testing deployed production website, but tests are run on the main branch. But it's still a pretty good indication, because I have auto-deployment of the main branch as long as unit tests are passing, so it should be accurate most of the time - For "Baseline management" I selected "Git", will test how "Visual Git" works for another project and update the article
- Link your GitHub repository to see at which commit the test was run
- Copy
PERCY_TOKENand ignore setup guides - Go to the "Project settings" and under "Project Details" clear the "Auto-approve branches" field, it should be empty, and click "Save"
Configuring GitHub Actions
Add a secret

- Open your GitHub repository → Settings → Security → Secrets and variables → Actions
- Add "New repository secret":
- Name:
PERCY_TOKEN - Secret: the token you copied in the Setting up Percy section
- Name:
Prepare your project
- Pin the
@percy/cliversion to ensure your workflow doesn't break with new version releases:npm install --save-dev @percy/cli - Create Percy config:
Change snapshot widths innpx percy config:create.percy.ymlif you'd like, the number of widths will affect your limit usage, see the Staying Within Free Plan Limits section for details - Pin NodeJS version to ensure the runtime in GitHub Actions is the same as your local:
node -v > .nvmrc - Make sure your website has a Sitemap as it'll be used by Percy to find all your website pages; See
percy snapshotcommand docs for more options
Create a workflow
Create .github/workflows/percy.yml file in your repository:
name: Percy
on:
schedule:
- cron: '0 23 * * *'
workflow_dispatch: # for manual testing
jobs:
percy:
runs-on: ubuntu-latest
steps:
- name: Checkout
uses: actions/checkout@v3
- name: Use Node.js
uses: actions/setup-node@v3
with:
node-version-file: '.nvmrc' # to create this file, run `node -v > .nvmrc`
cache: 'npm'
- name: Install NPM dependencies
run: npm ci # make sure you have `@percy/cli` installed and `package-lock.json` file
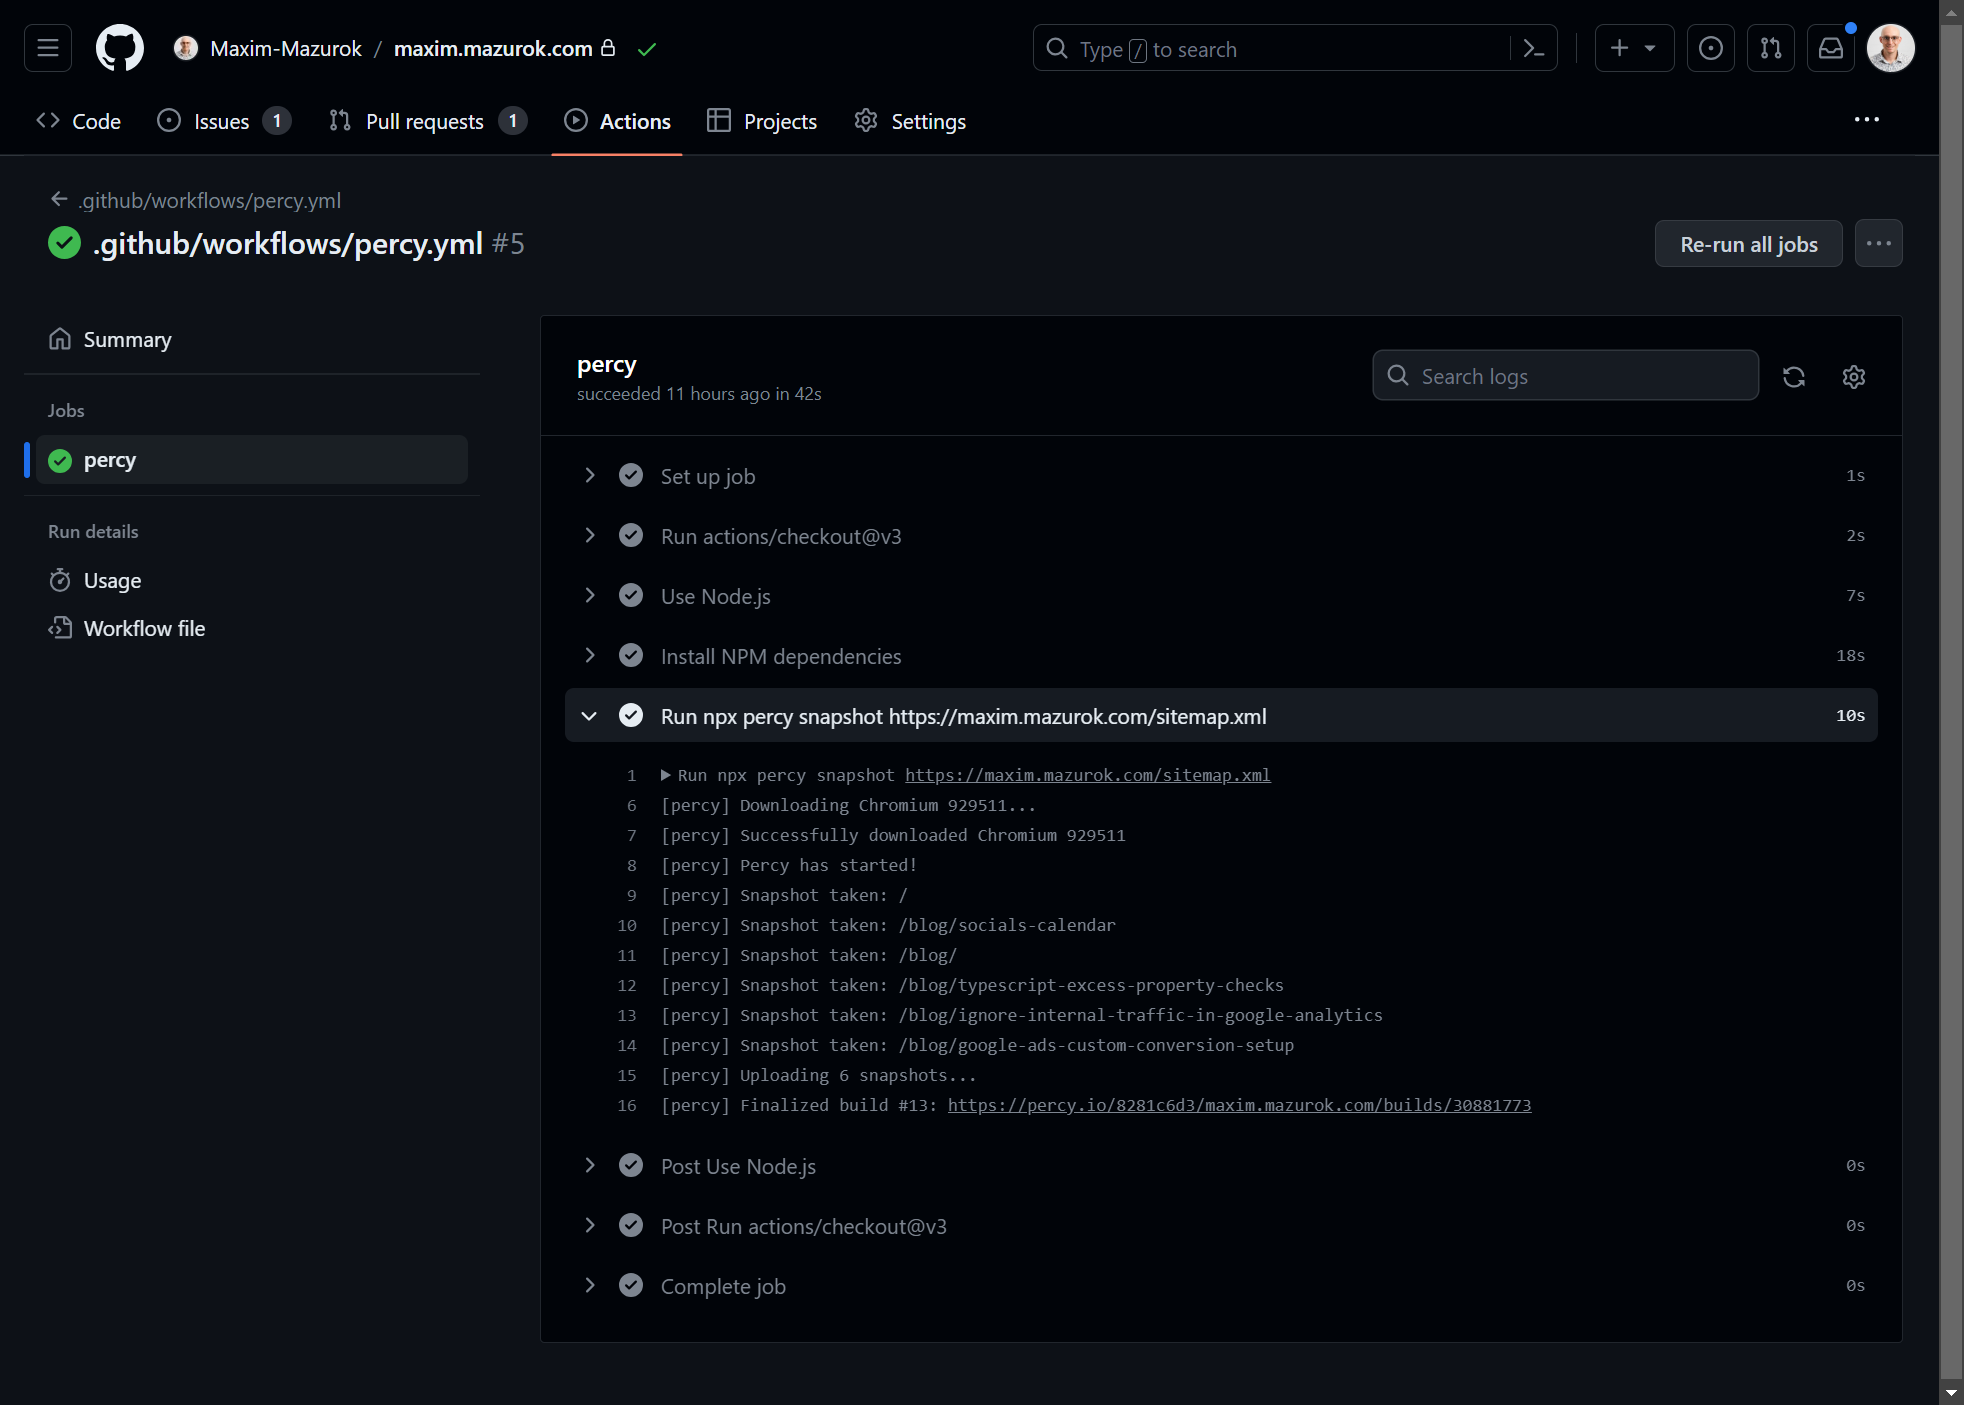
- name: Run Percy
run: npx percy snapshot https://maxim.mazurok.com/sitemap.xml # replace with your sitemap URL
env:
PERCY_TOKEN: ${{ secrets.PERCY_TOKEN }}
It's inspired by the official Integrate Percy with GitHub Actions article.
In summary, it will use NodeJS, install NPM dependencies, and run Percy once every day.
Let's break it down:
cron: '0 23 * * *'- this is a schedule- Note, that this is in UTC, you can use websites like WorldTimeBuddy to figure out what is your local time in the UTC timezone
- To create and test your schedule I recommend crontab guru
- See Staying within free plan limits on how to calculate the schedule
workflow_dispatch- this will let you run the workflow manually without waiting for the schedule, to do that after committing this workflow file to your repository, go to Actions → Percy → Run workflowCheckoutstep downloads your project into GHA environmentUse Node.jsstep will install the required NodeJS version, make sure you have.nvmrcfileInstall NPM dependenciesstep will install dependencies cleanly, make sure that you havepackage-lock.jsonRun Percystep is where Percy will download your website sitemap and make screenshots of all the pages listed in there
Staying Within Free Plan Limits
Percy's free plan currently has the following limitations:
- Up to 5000 screenshots per month (check current pricing)
- Can't disable any desktop browsers, have to use all 4
- Can't enable any mobile browsers
So if your website has 6 pages and you are only interested in 2 screen resolutions - then the formula would look like this:
5000 screenshots / (4 browsers * 2 screen sizes * 6 pages) / 30 days ~= 3 times per day
Constants:
5000 screenshots4 browsers30 days
Variables:
2 screen sizes- configured by a number ofsnapshot.widthentries in.percy.yml, 2 by default6 pages- depends on how many pages are in your sitemap
As you can see, I can run my tests approximately 3 times per day and stay within the free tier limit. I think that one time per day should be enough for my case, and also leaves quite a bit of room for growth of the website before I'll have to change this.
Pro tip: you can quite easily add HTML snapshot testing for your pages using Jest or Vitest if you would like to add more certainty while keeping expenses and maintenance costs low.
Setting up Slack notifications
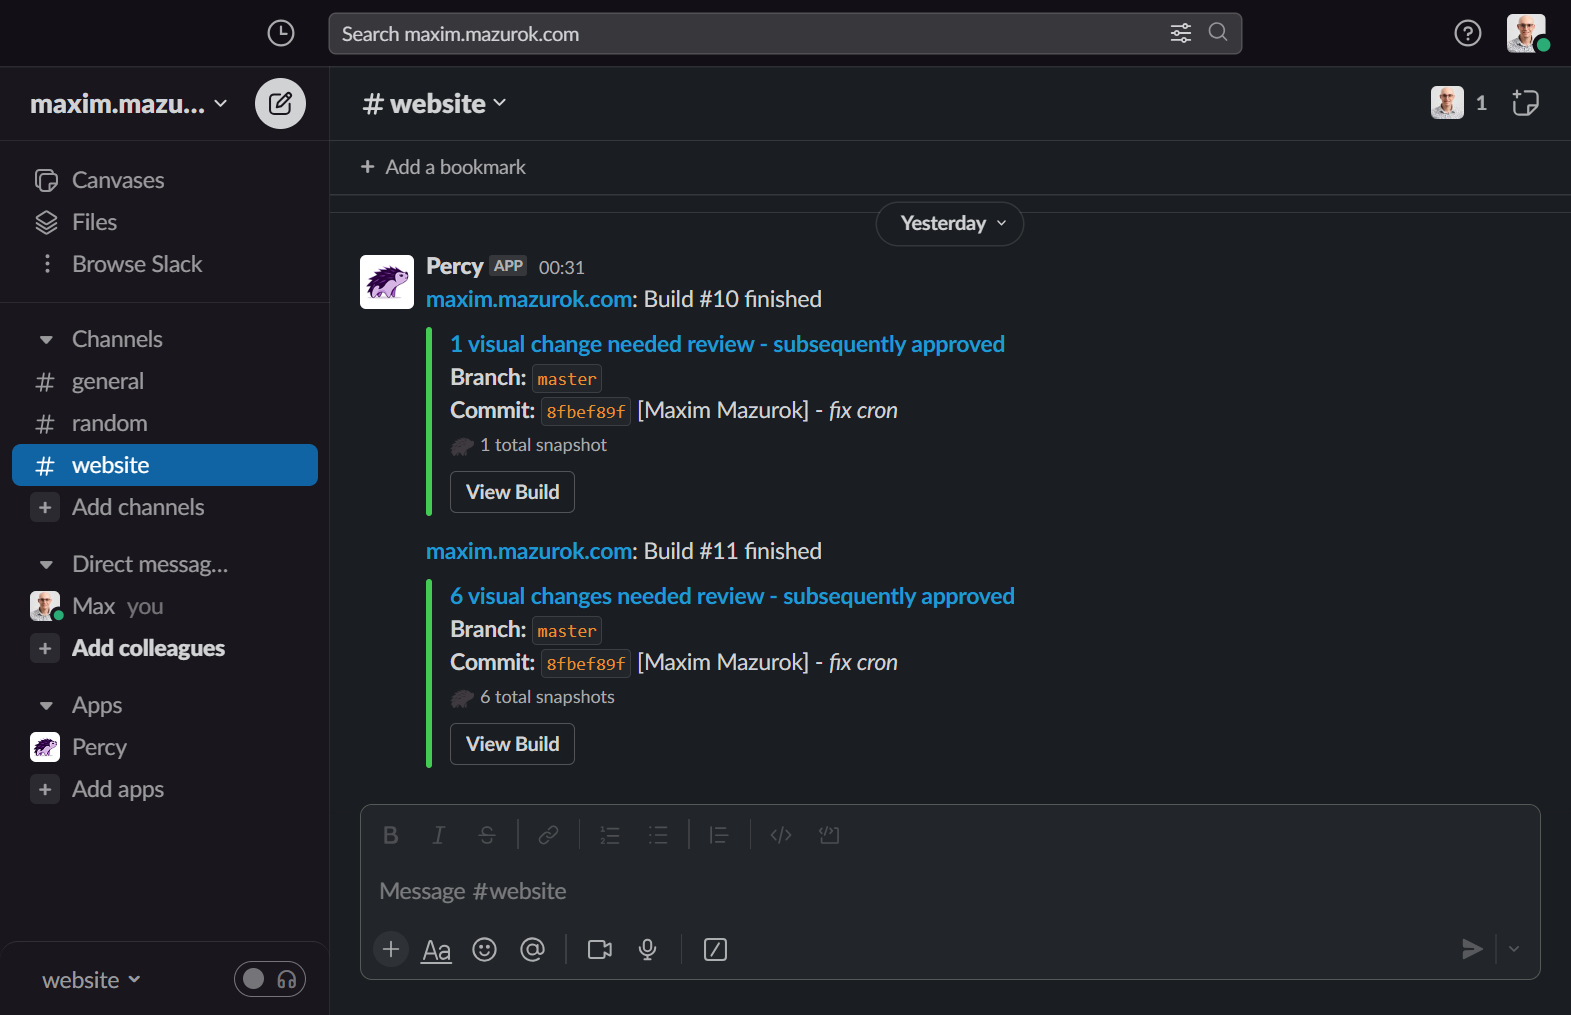
- Sign up at Slack and create a workspace for your website (you don't have to use it for anything other than notifications)
- In Percy go to "Integrations", find "Slack" and click "Install", select
#generalchannel and "Unreviewed & Changes requested" notifications - Now you might want to install the Slack app to your mobile phone, sign in, and make sure notifications are enabled on the device
Conclusion
With the described setup my workflow looks like this:
- I make changes to the website, push them to the main branch, it gets automatically deployed to production (using Heroku GitHub Deploys)
- Every day at 10 am GitHub Actions runs Percy and if something visually changes on the website - I get a notification in Slack to review the change
This approach allows me to maintain a high velocity of development and deployment as I don't have to go through reviews every time I make a visual change. I get to review and address visual changes at my own pace because reviews don't block anything. And I will get notified about visual changes so I can address unexpected regressions promptly.
Please, share (Tweet) this article if you found it helpful or entertaining!